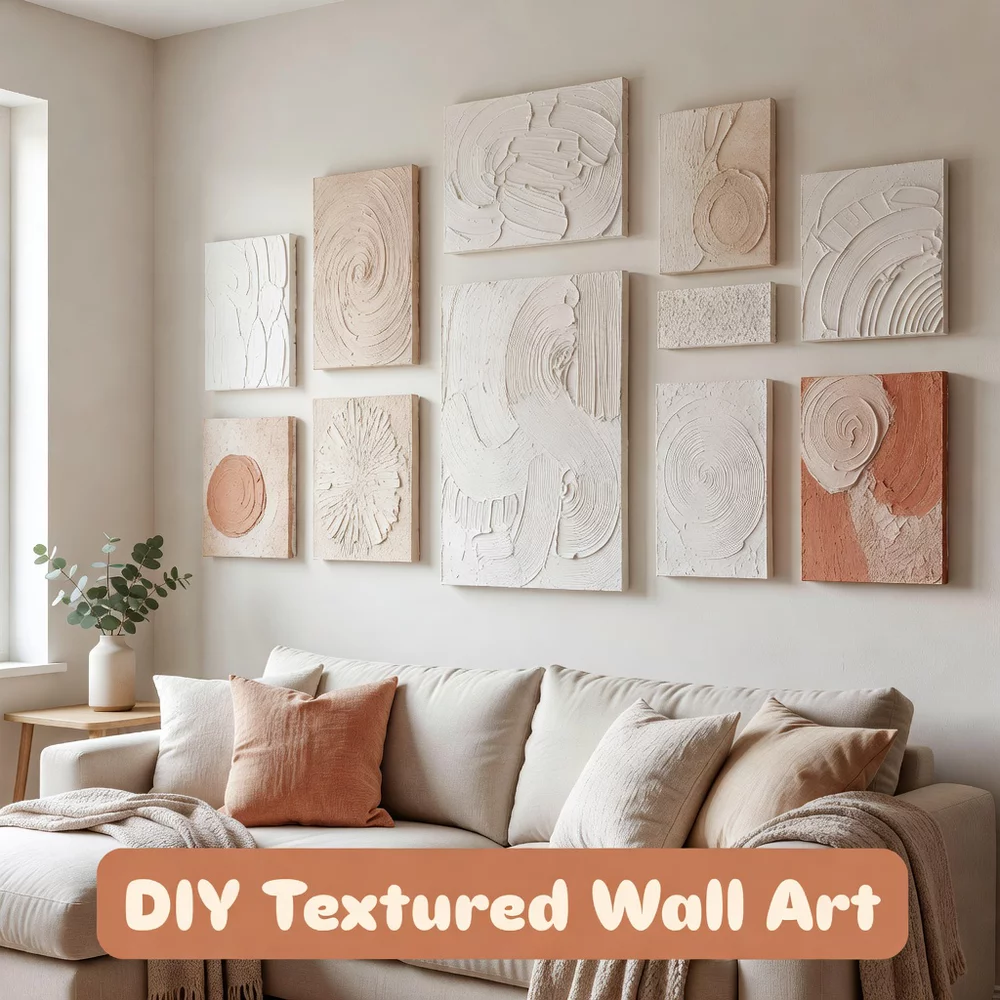
Creating beautiful textured wall art at home is not only accessible but also deeply rewarding. With the right techniques, you can transform ordinary canvases into stunning masterpieces using simple plaster and paint. Dive into these 7 practical methods that will inspire your next DIY project!
DIY Plaster Wall Art on Canvas Using Joint Compound and Paint
Transform your canvas into stunning textured art with ease.
As an Amazon Associate I earn from qualifying purchases. Affiliate links may earn me a commission at no extra cost to you.
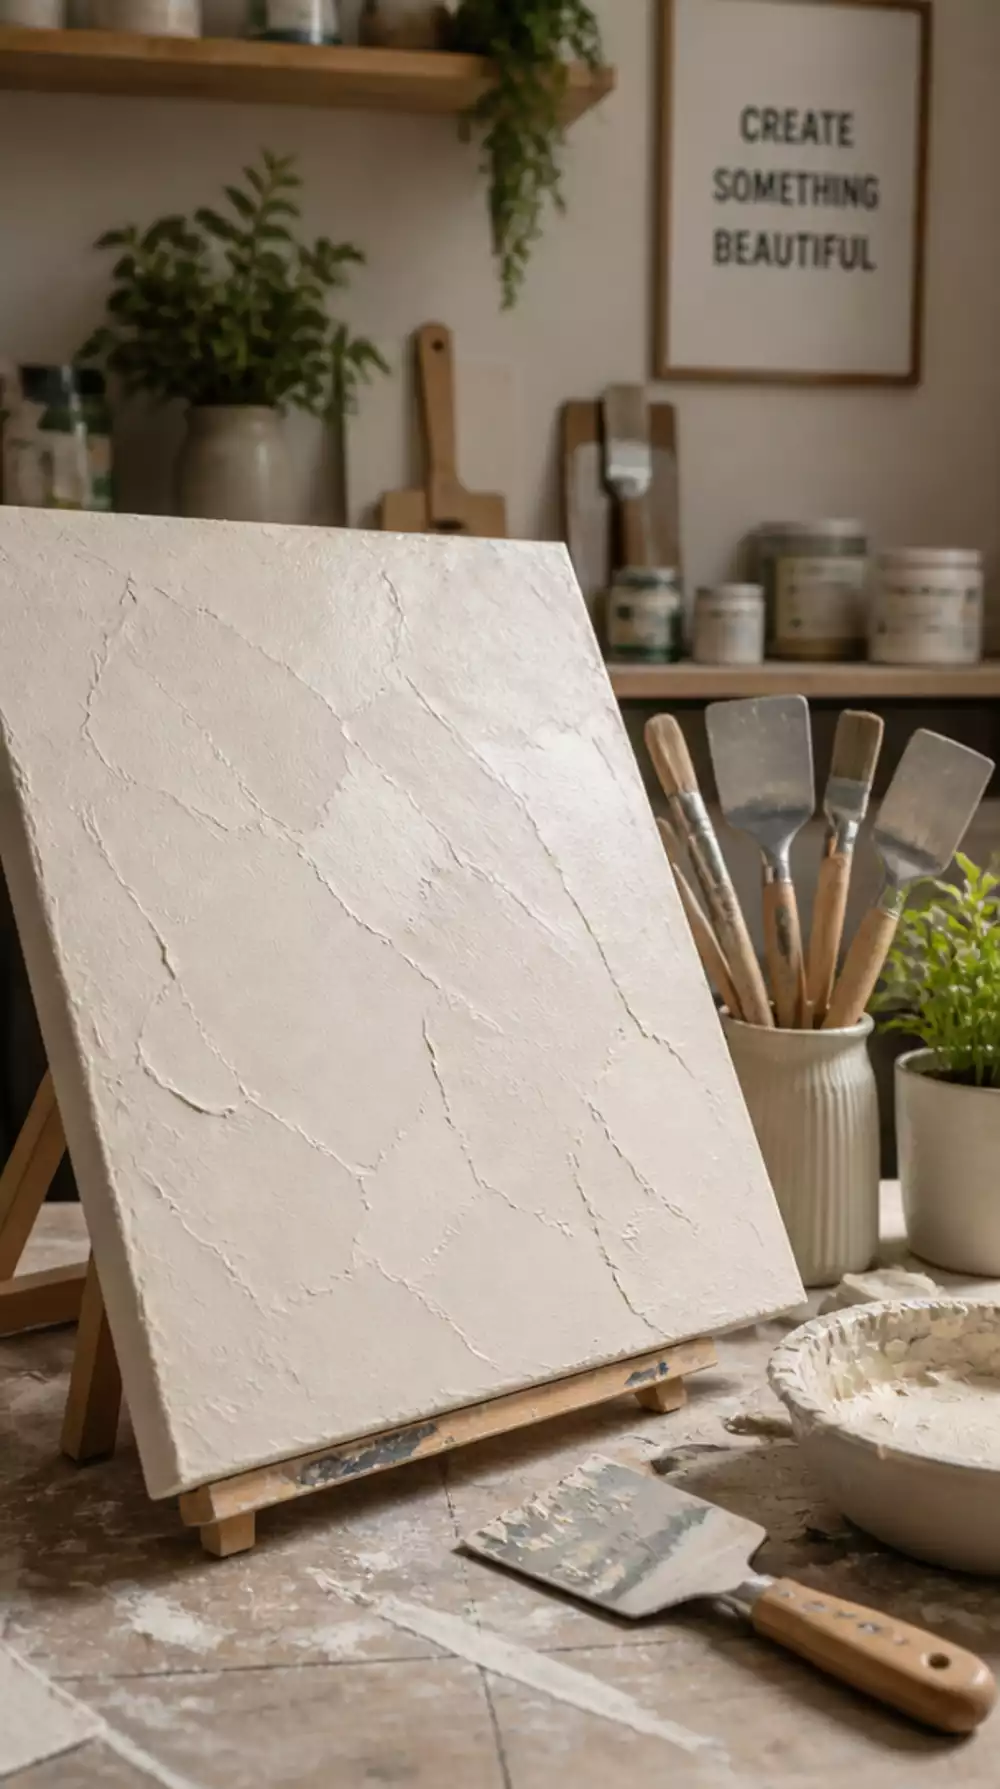
Understanding DIY Plaster Wall Art on Canvas: To create striking wall art, joint compound serves as a versatile medium for textured designs. Its ability to create various textures allows for creativity, whether you prefer rough, organic patterns or smooth finishes. Start by mixing the compound to a creamy consistency, apply it to your canvas using spatulas or brushes, and let it dry completely for the best results.
Where Most People Get Stuck: Many DIYers underestimate the importance of exploring different tools for texture creation. For example, using a palette knife instead of a brush can dramatically change the look of your piece. Experimenting with various applicators can lead to surprising and beautiful textures that elevate your art.
- ★Start with a high-quality art paint set for vibrant colors.
- ★Mix your joint compound to a consistent texture for even application.
- ★Avoid applying too much paste at once; build up layers gradually.
⭐ Top Products for DIY Plaster Wall Art
Art Paint Set with Canvas Panels
This set is perfect for beginners creating textured wall art on canvas with ease.
View on Amazon →Metal Vase Wall Art Set
This set offers stylish decor suitable for enhancing various rooms effortlessly.
View on Amazon →Rustic Flower Wall Art Set
This set features minimalist flower designs that elevate your living space beautifully.
View on Amazon →⚡ Your Quick Start Guide:
- Prep your canvas: Ensure it's clean and dry for smooth application of joint compound.
- Mix for consistency: Aim for a creamy texture to avoid clumping when applying.
- Layer wisely: Build up textures gradually; too much at once can lead to cracking.
Swirl Textured Wall Art Made with a Creamy Paste on Canvas
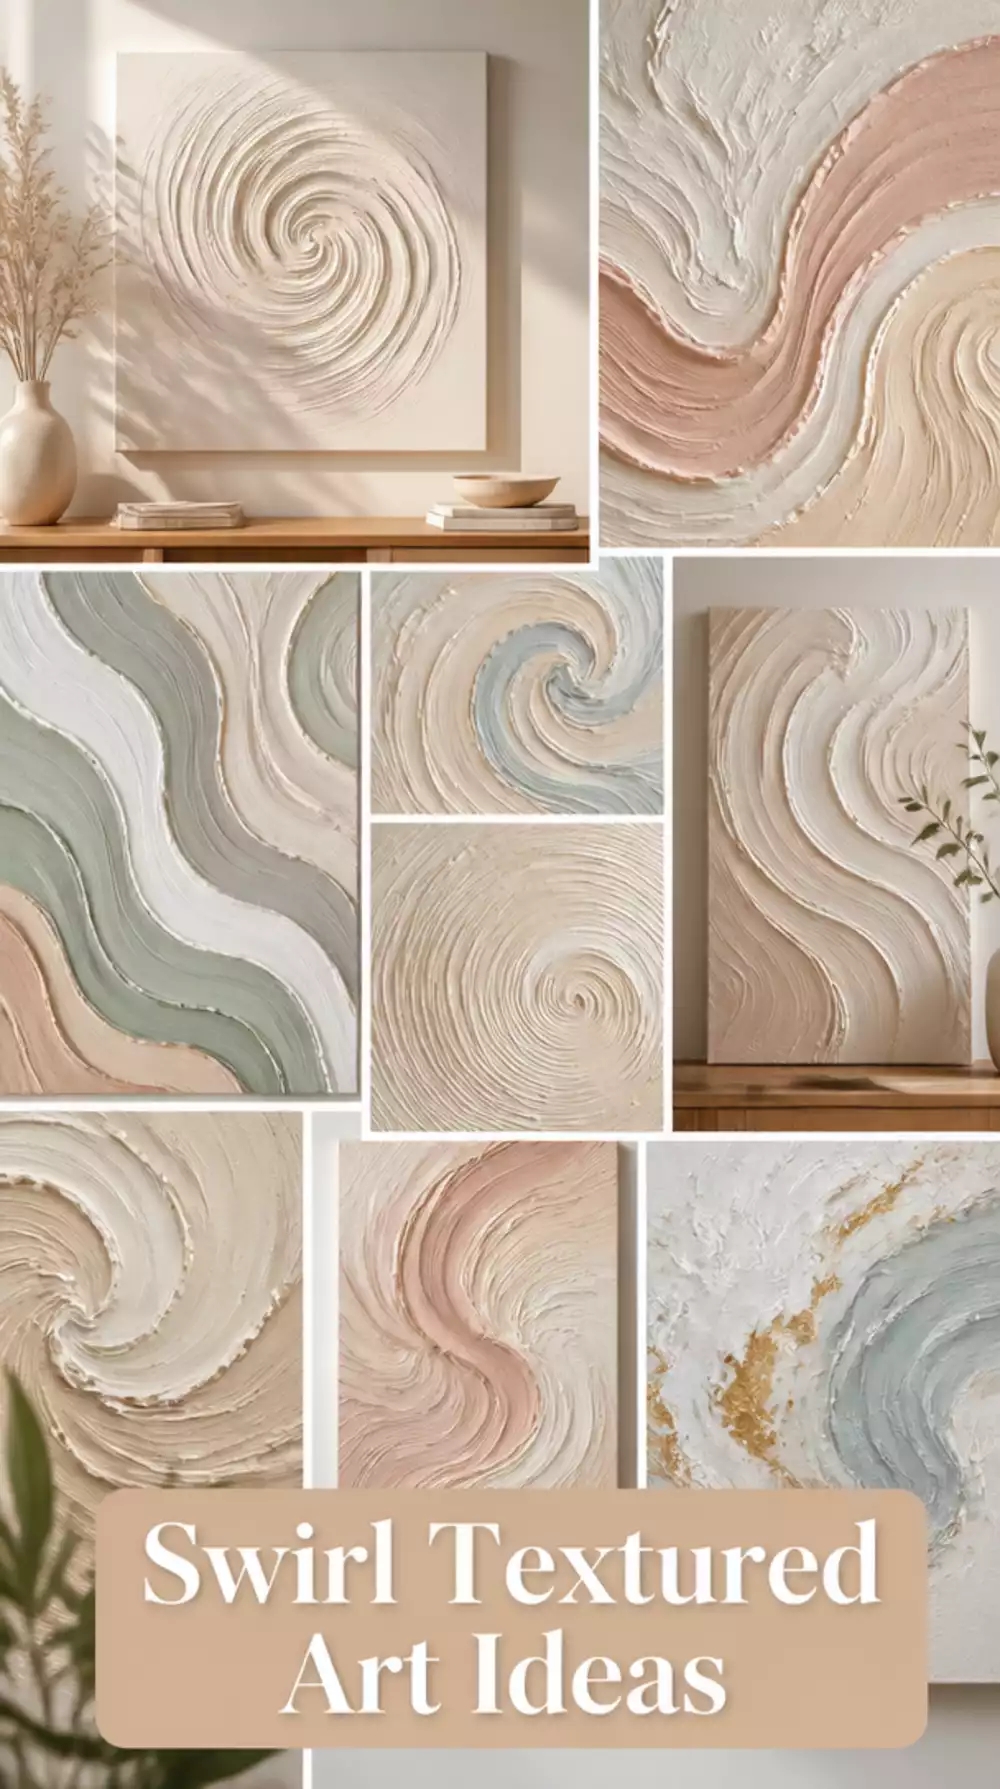
Elevate your art with dynamic swirling textures.
The Beauty of Swirl Textures: Swirl textures can add dynamic movement to your home art. Using a creamy paste allows you to create stunning effects that differ from traditional joint compound. With the right techniques, you can achieve a smooth finish that enhances depth and draws the eye.
What People Rarely Consider is how mixing colors directly into the creamy paste can create a marbled look that adds even more visual interest. Many DIYers might overlook this simple yet effective technique, thinking they need to layer colors separately. Incorporating the colors within the paste not only simplifies the process but creates a more cohesive design.
- ★Experiment with different swirling techniques using palette knives for unique effects.
- ★Mix colors in the paste to achieve beautiful marbled patterns effortlessly.
- ★Be cautious not to overwork the paste; too much blending can lose the swirl effect.
⭐ Top Products for Swirl Textured Wall Art
Motivational Canvas Wall Art Set
This gallery-wrapped canvas set adds inspiring art with a creamy paste feel to your space.
View on Amazon →Fantasy Landscape Wall Art
Enhance your decor with this beautiful landscape print that complements swirl textured art.
View on Amazon →Vintage Pine Tree Wall Art
This charming rustic piece adds a cozy feel, balancing the vibrant swirls in your art.
View on Amazon →💡 Quick Tips:
- Mix a variety of colors: Create stunning marbled effects by blending colors directly into your creamy paste.
- Use palette knives: Experiment with different sizes and shapes for unique swirl patterns.
- Work quickly: Keep an eye on the paste's drying time to maintain a workable consistency for swirling.
Living Room Neutral Abstract Plaster Canvas with a Palette Knife

Transform your living space with calming abstract art.
Why Neutral Abstract Plaster Art Transforms Spaces: Creating a neutral abstract piece can transform your living space into a tranquil haven. Using a palette knife allows for unique textures and layers, making your artwork not just visually appealing, but also a personal expression of style. The versatility in design allows you to adapt the artwork to fit effortlessly into any decor.
One common oversight in abstract art is not experimenting enough with layer depth; subtle variations can lead to stunning visuals. For example, using a palette knife to create intricate layers can add dimension, but many beginners stick to flat applications, missing out on the full potential of their piece.
- ★Choose a neutral palette like soft grays and whites for a calming effect.
- ★Use a high-quality palette knife for smoother textures and better control.
- ★Avoid applying too much pressure with the knife to maintain a delicate balance in design.
⭐ Top Products for Living Room Neutral Abstract Art
Large Tree of Life Wall Art
The Large Tree of Life art piece creates a stunning focal point in any living room.
View on Amazon →Zen Stones in Water Canvas Art
This minimalist art promotes tranquility and calmness in your living spaces.
View on Amazon →Vintage 3D Textured Wall Art
A stunning textured piece that adds elegance and depth to neutral decor.
View on Amazon →💡 Quick Tips:
- Choose a soft neutral palette: Soft beiges and tans create a calming atmosphere.
- Layer your textures: Use a gentle hand with the palette knife to build depth.
- Experiment with shapes: Don’t hesitate to create unique forms that speak to your style.
Budget Textured Wall Art DIY Using Dollar Store Supplies Only

Create stunning wall art without spending a fortune!
Why Budget Textured Wall Art Matters: You don’t need to break the bank to create stunning textured wall art. Utilizing budget-friendly materials from dollar stores can result in impressive pieces that will adorn your home beautifully. Think simple canvases, acrylic paints, and various tools that can help you achieve a professional look on a dime.
Where most people get stuck is underestimating the quality of inexpensive materials. Dollar store supplies can yield extraordinary results if you carefully select items like canvases and textures that spark creativity. For example, using a basic joint compound with acrylic paint can transform a simple canvas into a striking masterpiece without hefty expenses.
- ★Look for acrylic paints and canvases at your local dollar store to keep costs low.
- ★Experiment with texture tools like sponges and brushes to create unique designs.
- ★Don’t overestimate the cost; you can create stunning art with very few supplies.
⭐ Best Budget Options for DIY Wall Art
Framed Canvas Wall Art Set
This affordable set perfectly enhances your decor and is easy to install, making it ideal for DIYers.
View on Amazon →Metal Flowers Wall Art Set
Elevate your spaces with these charming metal flowers that add rustic charm to your walls.
View on Amazon →Minimalist Flower Wall Art
This stylish floral design complements any room, making it a versatile decor choice.
View on Amazon →💡 Quick Tips:
- Choose quality over quantity: Select a few essential supplies for the best results.
- Mix colors creatively: Experiment with different paint mixes to achieve unique shades.
- Test textures first: Always try a small sample on scrap material before applying to your canvas.
You're already halfway through these creative ideas, and that's a fantastic achievement! Every stroke of plaster brings you closer to a unique piece of art. Cultivating beauty in your home is about enjoying the process, not just the final outcome.
💡 Worth Remembering:
- Avoid using too much water when mixing plaster for strength.
- Patience during drying time helps achieve a solid finish.
- Test your custom color palette on a separate surface first.
- Embrace imperfections as part of your art's unique character.
Organic Wave Plaster Wall Art Canvas in Warm Sand and Ivory
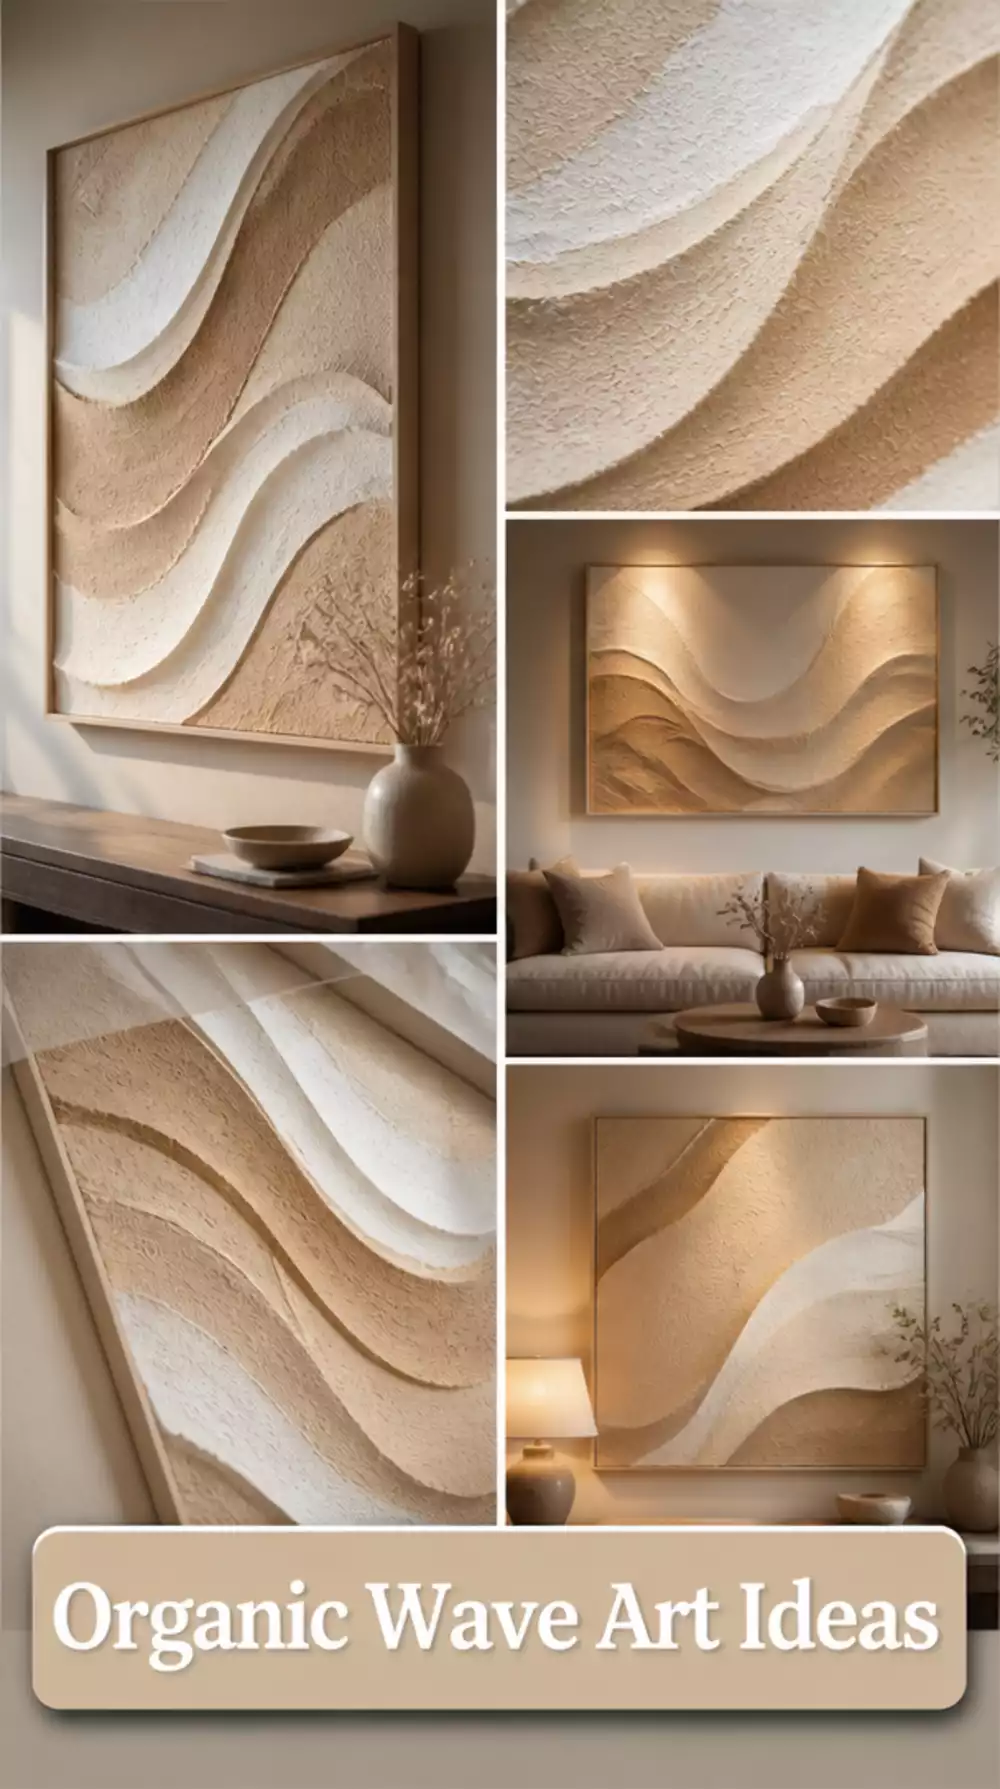
Transform your space with calming wave-inspired art.
Why Organic Wave Plaster Art Matters: Organic wave designs can create a serene atmosphere in your home, enhancing your decor with their gentle, flowing forms. Using plaster or joint compound, you can achieve this textured look with warm sand and ivory colors, making it a perfect fit for contemporary aesthetics.
What People Rarely Consider: Many DIYers overlook the importance of a smooth, even base layer when creating organic wave designs. Skipping this step can lead to inconsistent textures that detract from the overall effect. Take the time to lay a solid foundation; it will pay off in the final piece.
- ★Start with a primed canvas to ensure the plaster adheres properly.
- ★Mix warm sand and ivory tones to create a harmonious color palette that radiates warmth.
- ★Avoid rushing the drying process to maintain the integrity of the wave textures.
⭐ Editor’s Picks for Organic Wave Plaster Art
Metal Flowers Wall Art Set
Charming floral wall art enhances your organic decor style, making it a perfect addition.
View on Amazon →Minimalist Flower Wall Art
This sophisticated art complements various interior styles, enhancing your organic wave designs beautifully.
View on Amazon →💡 Quick Tips:
- Prepare Your Canvas: Ensure it's primed for optimal plaster adhesion and a smooth finish.
- Layer Wisely: Apply a consistent base layer before shaping the organic waves for best results.
- Mix Colors Carefully: Blend warm sand and ivory for a natural palette that enhances your decor.
Living Room White Plaster Wall Art Panel with a Limewash Finish
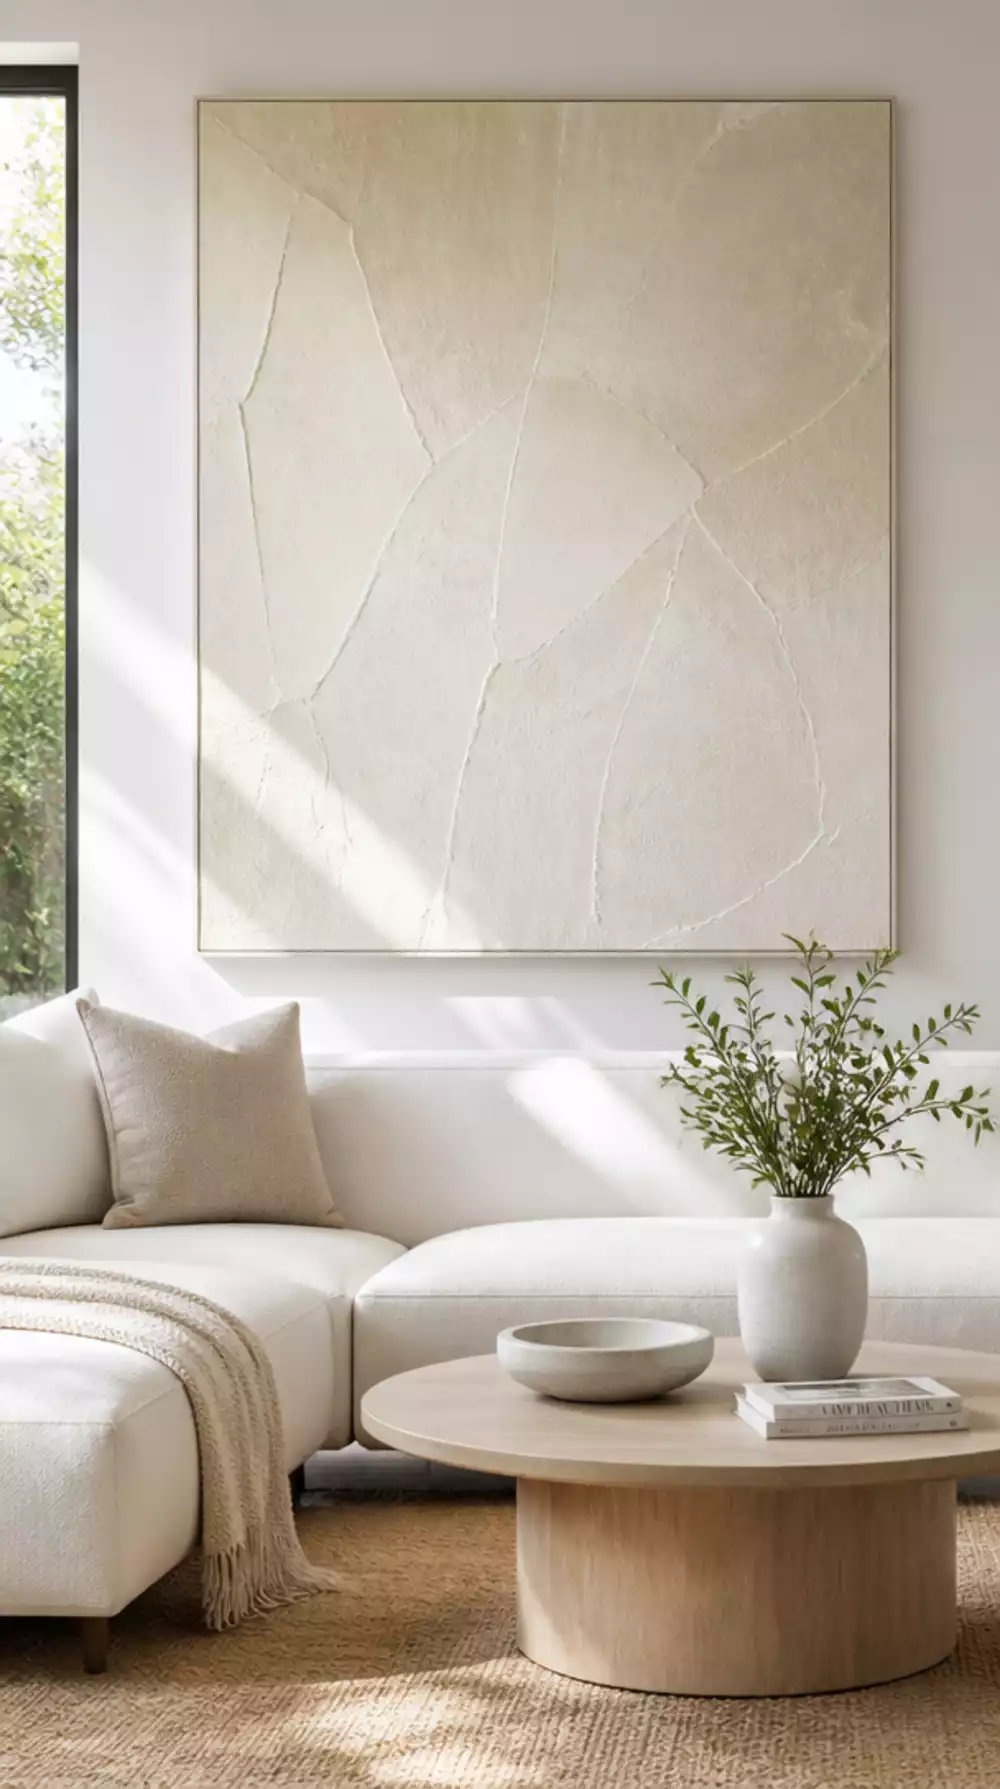
Elevate your living space with elegant white plaster art.
How a Limewash Finish Enhances White Plaster Art: Achieving a smooth, sophisticated look in your living room can be simple with a limewash finish on white plaster wall art. This method not only adds depth but also enhances the overall brightness of your decor, making it feel more open and inviting.
The consistency of your limewash is key to success. Many people overlook the importance of thorough mixing, which can lead to uneven textures. A well-mixed limewash creates a more cohesive finish, making your art stand out beautifully against your walls.
- ★Mix your limewash thoroughly to ensure even application.
- ★Use high-quality plaster for a more durable finish.
- ★Allow ample drying time to avoid cracking in the plaster.
⭐ Best Products for White Plaster Wall Art
Framed Canvas Wall Art Set
This stylish decor with neutral tones enhances any room, making it perfect for white plaster art.
View on Amazon →Gold Line Art Wall Decor
The elegant metal line art complements modern decor styles beautifully alongside white plaster.
View on Amazon →Vintage Floral Wall Art Decor
Charming floral prints add a touch of elegance, enhancing white plaster wall aesthetics.
View on Amazon →💡 Best Practices:
- Mix limewash to a creamy consistency: This ensures a smooth application and better adhesion.
- Test your technique on a scrap piece: This helps you perfect your finishing touches before the final application.
- Use natural light to assess your work: It showcases the texture and highlights any areas needing adjustment.
The Cheap Plaster Paste Trick That Makes DIY Canvas Look Gallery-Quality
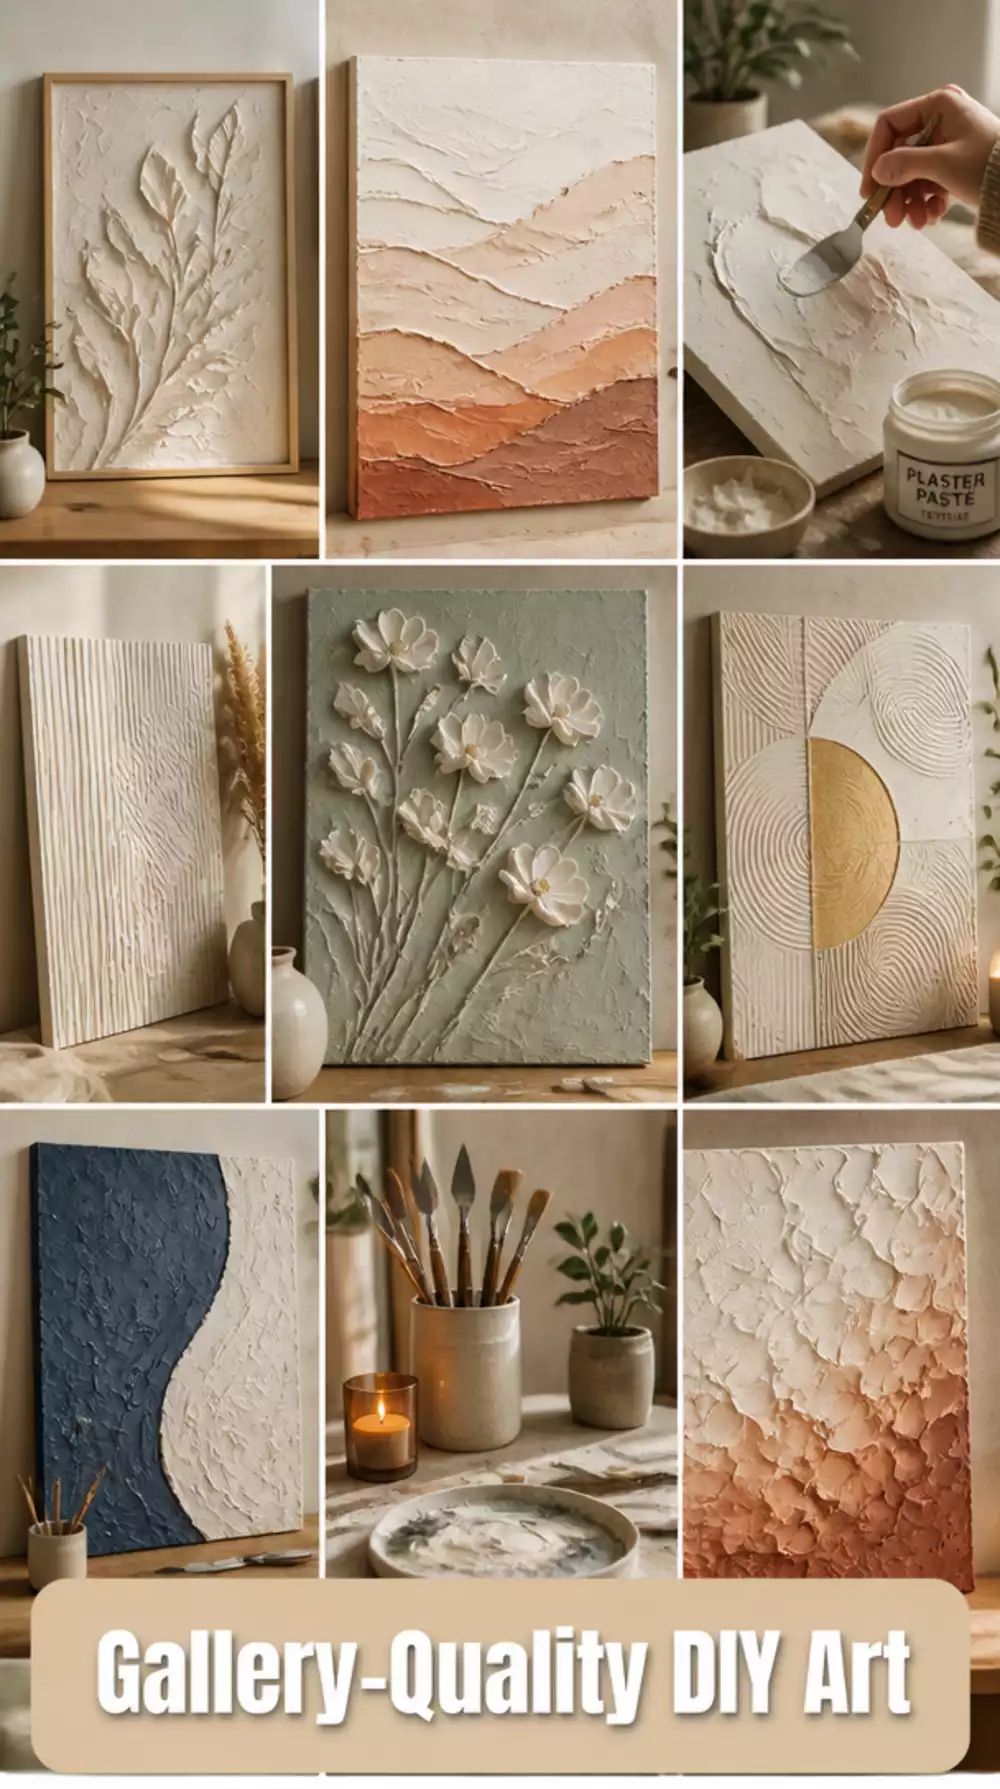
Transform your DIY projects into stunning gallery-worthy pieces
How the Cheap Plaster Paste Trick Enhances Your Art: You can achieve gallery-quality art at home without spending a fortune. Using plaster paste can transform your DIY projects into professional-looking masterpieces, enabling you to create depth and unique textures. Layering techniques combined with skilled application can make your pieces truly pop.
A subtle issue that adds up involves the misconception that DIY art must always look amateurish. Many new DIY enthusiasts overlook the importance of quality materials and techniques. For instance, using plaster paste correctly can enhance your final product substantially—it’s about understanding how to layer and texture effectively to achieve that refined look.
- ★Experiment with various tools to manipulate textures and achieve unique finishes.
- ★Use high-quality plaster paste for better adhesion and texture outcomes.
- ★Don’t rush the drying time; allow layers to set fully for the best results.
⭐ Best Products for Gallery-Quality DIY Canvas
Peel and Stick Wallpaper
Use this removable wallpaper to easily enhance your DIY canvas art with stylish effects.
View on Amazon →Metal Flowers Wall Art Set
This versatile floral set adds charm to your space, complementing DIY plaster designs beautifully.
View on Amazon →Geometric Decor Wall Art
Add a contemporary touch with this geometric art, enhancing your DIY masterpieces seamlessly.
View on Amazon →🚀 Quick Tips:
- Experiment with layers: Layer different colors of plaster paste for added depth and interest.
- Choose the right tools: Use a variety of spatulas and brushes to create unique textures.
- Patience is key: Allow each layer to dry completely before adding more for the best results.
You now have seven inspiring techniques at your fingertips to create stunning textured wall art. Begin with what feels manageable, whether it's experimenting with a simple swirl or crafting a neutral abstract piece.
Every step you take towards enhancing your space reflects your unique style and fosters a sense of comfort. Embrace the joy of creativity and let your walls tell your story.